Python projects with Poetry and VSCode Part 3
In the first article we started a new project, created a Virtual Environment and managed dependencies. In the second part, added our virtual Environment to VSCode and integrated our dev dependencies.
And finally, in this third and last part we’ll:
- Write a sample library.
- Build our project with Poetry.
- Publish it on PyPI.
Poetry Commands
Here is a table with the commands used in this series as well as their descriptions. For a full list, read the Poetry Documentation.
| Command | Description |
|---|---|
poetry new [package-name] | Start a new Python Project. |
poetry init | Create a pyproject.toml file interactively. |
poetry install | Install the packages inside the pyproject.toml file. |
poetry add [package-name] | Add a package to a Virtual Environment. |
poetry add -D [package-name] | Add a dev package to a Virtual Environment. |
poetry remove [package-name] | Remove a package from a Virtual Environment. |
poetry remove -D [package-name] | Remove a dev package from a Virtual Environment. |
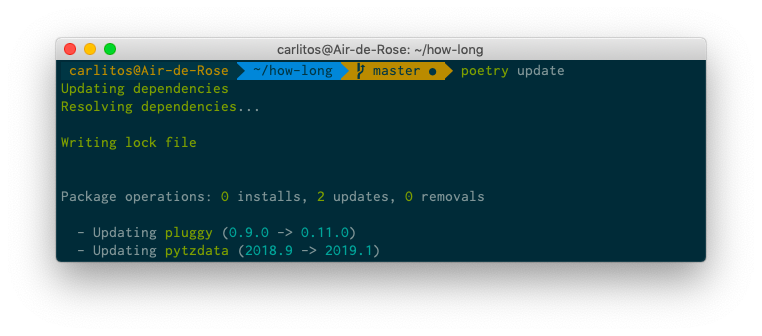
poetry update | Get the latest versions of the dependencies |
poetry shell | Spawns a shell within the virtual environment. |
poetry build | builds the source and wheels archives. |
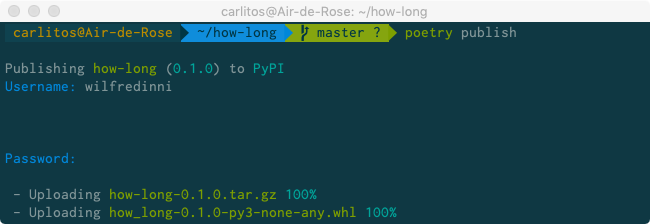
poetry publish | Publish the package to Pypi. |
poetry publish --build | Build and publish a package. |
poetry self:update | Update poetry to the latest stable version. |
The Project
You can download the source code from GitHub if you like, but as mentioned earlier, this will be a simple decorator that will print to the console how long it takes for a function to run.
It will work like this:
from how_long import timer

@timer
def test_function():
    [i for i in range(10000)]

test_function()
# Execution Time: 955 ms.
And the project directory will be as follows:
how-long
├── how_long
│   ├── how_long.py
│   └── __init__.py
├── how_long.egg-info
│   ├── dependency_links.txt
│   ├── PKG-INFO
│   ├── requires.txt
│   ├── SOURCES.txt
│   └── top_level.txt
├── LICENSE
├── poetry.lock
├── pyproject.toml
├── README.rst
└── tests
    ├── __init__.py
    └── test_how_long.py
Before we start, check for package updates with the poetry update command:
Add a brief description for the project in the README.rst:
how_long
========

Simple Decorator to measure a function execution time.

Example
_______

.. code-block:: python

    from how_long import timer


    @timer
    def some_function():
        return [x for x in range(10_000_000)]
Navigate to how_long/how_long.py:
# how_long.py
from functools import wraps

import pendulum


def timer(function):
    """
    Simple Decorator to measure a function execution time.
    """

    @wraps(function)
    def function_wrapper():
        start = pendulum.now()
        function()
        elapsed_time = pendulum.now() - start
        print(f"Execution Time: {elapsed_time.microseconds} ms.")

    return function_wrapper
In how_long/__init__.py:
from .how_long import timer

__version__ = "0.1.1"
And finally, the tests/test_how_long.py file:
from how_long import __version__
from how_long import timer


def test_version():
    assert __version__ == "0.1.1"


def test_wrap():
    @timer
    def wrapped_function():
        return

    assert wrapped_function.__name__ == "wrapped_function"
You can now use poetry install on your terminal to install and prove your package locally. Activate your virtual environment if you haven’t and in the Python interactive shell:
>>> from how_long import timer
>>>
>>> @timer
... def test_function():
...     [i for i in range(10000)]
...
>>> test_function()
Execution Time: 705 ms.
Run the tests and if everything is fine, move on.
Building and Publishing
Finally, the time to make this project available to the world has come! Make sure you have an account on PyPI. Remember that the package name must be unique, if unsure, use the search to check it out.
Build
The poetry build command builds the source and wheels archives that will later be uploaded as the source of the project:
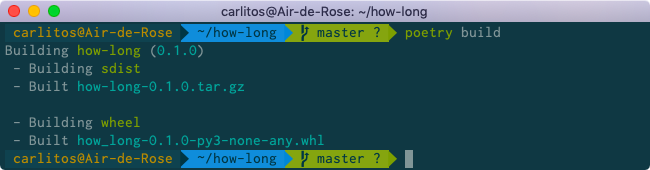
The how_long.egg-info directory will be created.
Publish
This command publishes the package to PyPI and automatically register it before uploading if this is the first time it is submitted:
You can also build and publish your project with
$ poetry publish --build.
Enter your credentials and if everything is ok, browse your project, and you’ll see something like this:

We can now let others know that they can pip install how-long from any machine, anywhere!
Conclusion
I remember the first time I tried to publish a package, and it was a nightmare. I was just starting in Python and I have to spend a “few hours” trying to understand what the setup.py file was and how to use it. In the end, I ended up with several files: a Makefile, a MANIFEST.in, a requirements.txt and a test_requirements.txt. That’s why the words of Sébastien Eustace, the creator of Poetry, made a lot of sense to me:
Packaging and dependency management in Python are rather convoluted and hard to understand for newcomers. Even for seasoned developers it might be cumbersome at times to create all files needed in a Python project:
setup.py,requirements.txt,setup.cfg,MANIFEST.inand the newly addedPipfile.So I wanted a tool that would limit everything to a single configuration file to do: dependency management, packaging and publishing.
It takes inspiration in tools that exist in other languages, like
composer(PHP) orcargo(Rust).And, finally, there is no reliable tool to properly resolve dependencies in Python, so I started
poetryto bring an exhaustive dependency resolver to the Python community.
Poetry is by no means perfect but, unlike other tools, it really does what promise.